User Guide (Manual) for Shop by Brand Extension
Key Features of Shop by Brand Extension
- ‘All Brands’ page for convenient brand browsing.
- Individual brand pages with brand info and related products.
- Maximize branded SEO traffic with landing pages for each brand.
- Introduce new brands in a seamless fashion using Featured brands.
- Add banners and descriptions to each brand page to attract and engage your customers.
- Integration with Layered Navigation by AgileCodex.
- Brand Page with Promotional Banners.
- Add a Brand Slider to Any CMS Page to Link Directly to Your Brand Pages.
- Brand Product listing with ease of adding/removing.
- Effortlessly Manage Your Brand Product Listings with Easy Add/Remove Options.
BRAND CONFIGURATION
Brand General Configuration
After installing the extensions, you need to set up the initial configurations first. The Brand General Configuration is very important and should be configured before inserting any brand information. We recommend not changing the Product Attribute setting once brand records are added. Here's a detailed description of each setting displayed in the form:
Access the Brand List by navigating to Agile Codex >> Brand Management >> click on Brand Configuration in the admin sidebar.

Here's a detailed description of each setting displayed in the form:
- Frontend Enabled: This setting enables or disables the brand functionality on the frontend of the store. When set to "Yes," the brand features will be visible to the customers.
- Product Attribute for Brand: This setting specifies the product attribute that will be used to identify the brand. This Product Attribute setting should not be changed once brand records are added.
- Show Config Less Brands: This setting determines whether to show brands that have less configuration or doesn't have products. When set to "Yes," brands without enough configurations will still be displayed.
- Allow Attribute Changes: This setting allows or disallows changes to product attributes once they have been added to a brand page. The tooltip indicates that changing attributes is discouraged if products are already added to the Brand Page.
"Products From Brand" Configuration
"Products from Brand" configuration form in Magento 2 allows you to manage various settings related to displaying products from specific brands. Here's a detailed description of each setting:
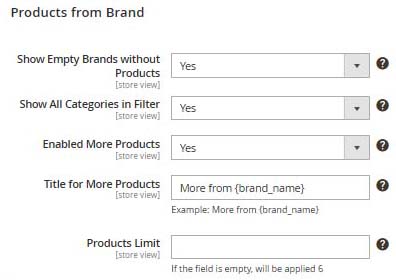
Here's a detailed description of each setting displayed in the form:
- Show Empty Brands without Products: Determines whether brands that currently have no associated products should still be displayed.
- Enabled More Products: Enables or disables the display of additional products related to the brand on a product page.
- Title for More Products: Sets the title for the section displaying more products from the brand. You can use the placeholder {brand_name} to dynamically include the brand's name in the title.
- Products Limit: Limits the number of products displayed from the brand on a product page. If left empty, a default value of 6 will be applied.
Brand URL Configuration
This section allows you to configure the URL settings for brand pages.
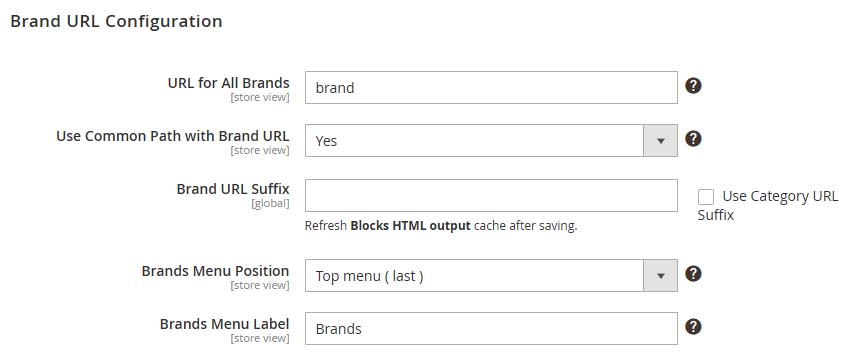
Here's a detailed breakdown of each setting:
- URL for All Brands: Specifies the base URL segment for the brand pages. In this example, the URL for all brands will start with
brand. - Use Common Path with Brand URL: When set to
Yes, this setting uses a common path for all brand URLs, simplifying the URL structure. - Brand URL Suffix: Defines a suffix to append to all brand URLs. Leaving this field empty means no suffix will be used. You can also choose to use the Category URL Suffix.
- Brands Menu Position: Sets the position of the Brands menu in the navigation. Options include placing it in the top menu (first or last) or in the footer.
- Brands Menu Label: Defines the label for the Brands menu in the navigation. In this example, it is set to
Brands.
Brand Page Configuration with Logo and SEO settings
The brand page settings allow you to display or hide the brand logo and description, configure the brand logo visibility on the brand listing page, and set meta title, keywords, and description for SEO purposes on the brand list page. Here's a detailed breakdown of each setting:
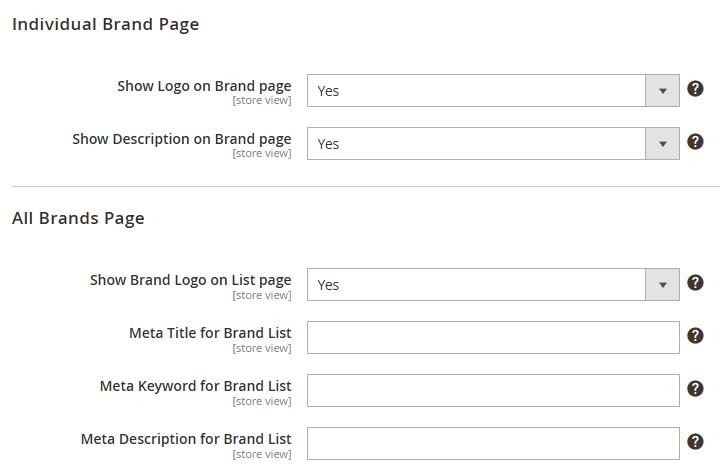
- Show Logo on a Brand page: You can display or hide a brand logo prominently on the designated brand page.
- Show Description on a Brand page: When set to
Yes, this setting ensures that the descriptive content associated with each brand is prominently shown on its respective page. - Show Brand Logo on List page: This setting typically allows visitors to see brand logos on brand listing page.
- Meta Title for Brand List: Enter meta keywords for SEO purposes on for Brand List page.
- Meta Keyword for Brand List: refers to a feature used in web development and SEO. It involves specifying keywords relevant to all brand listing index page.
- Meta Description for Brand List: allows you to provide a meta description for the brand list page.
Brand Configuration for Product List
The Product List settings allow you to customize how brands are displayed on product listing pages.
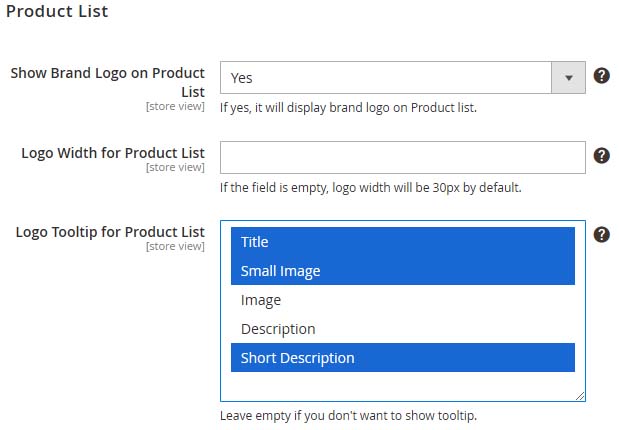
These configurations control the styling and visibility of brand logos or names alongside products, enhancing the brand-centric browsing experience for customers. Here's a detailed breakdown of each setting:
- Show Brand Logo on Product List configuration allows you to control whether the brand logos associated with products are displayed on product listing pages.
- Logo Width for Product List configuration allows you to specify the width of brand logos displayed on the product list page. If the field is left empty, the default logo width will be
30px. - Logo Tooltip for Product List configuration allows you to provide additional information or a tooltip that appears when users hover over the brand logo in the product list.
Brand Configuration for Product Page
These settings allow you to display the brand logo and description, set the brand logo width, configure tooltip content, and specify the maximum width for tooltip images on product lists and pages.
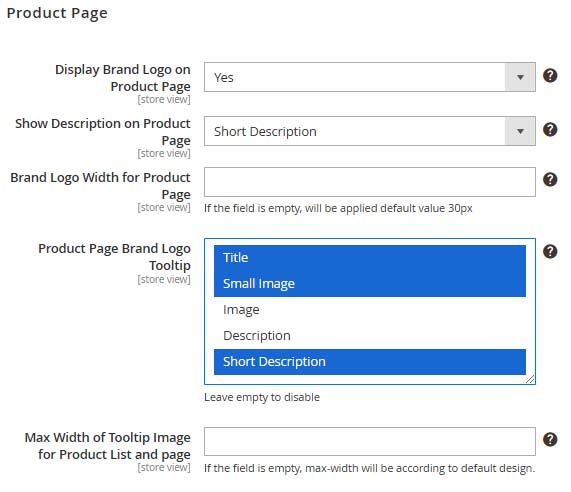
- Display Brand Logo on Product Page configuration allows you to determine whether the brand logo associated with a product is shown on the product detail page.
- Show Description on Product Page configuration allows you to display a detailed description of the brand on the product page. If you don't want to show it, set it as
disabled. - Brand Logo Width for Product Page setting allows you to specify the width of the brand logo displayed on the product page. If this field is left empty, a default width of
30pxwill be applied. - Product Page Brand Logo Tooltip allows you to customize the tooltip that appears when hovering over a brand logo on a product page. Leaving any of these fields empty will disable that specific part of the tooltip.
- Max Width of Tooltip Image for Product List and page allows you to specify the maximum width for tooltip images that appear on product lists and individual product pages. If the field is empty, max-width will be according to default design.
BRAND MANAGEMENT
Brand List
Brand List allows you to manage your brand information efficiently from the backend. Here's an overview of the functionality based on the provided image:
Access the Brand List by navigating to Agile Codex >> Brand Management >> click on Brand List in the admin sidebar.
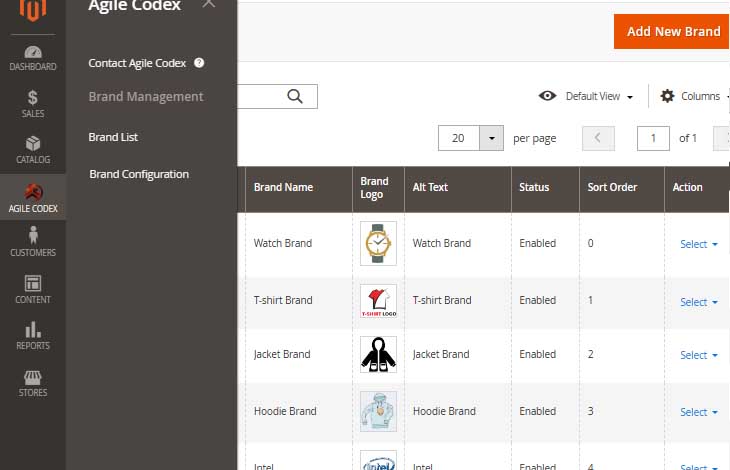
Brand List page displays a table with the following columns:
- Brand Name: Shows the name of the brand.
- Brand Logo: Displays the logo associated with each brand.
- Alt Text: Provides the alternative text for each brand logo, useful for accessibility and SEO.
- Status: Indicates whether the brand is enabled or disabled. Enabled brands are active and visible on the frontend.
- Sort Order: Determines the order in which brands are displayed. Brands with lower sort order values appear first.
- Action: Allows you to perform actions such as editing or deleting a brand. Clicking "Select" provides a dropdown with these options.
New Brand Form
Brand form allows administrators to create and manage brand entries for the Brand management. Below is a detailed description of the form fields and their functionalities based on the provided image:
Access the Brand List by navigating to Agile Codex >> Brand Management >> click on Brand List >> click on Add New Brand.
Brand Form Overview- Enable Brand: Turn this switch on to enable the brand. When enabled, the brand will be active and visible on the frontend.
- Brand TitleEnter the name of the brand. This field is required and serves as the primary identifier for the brand.
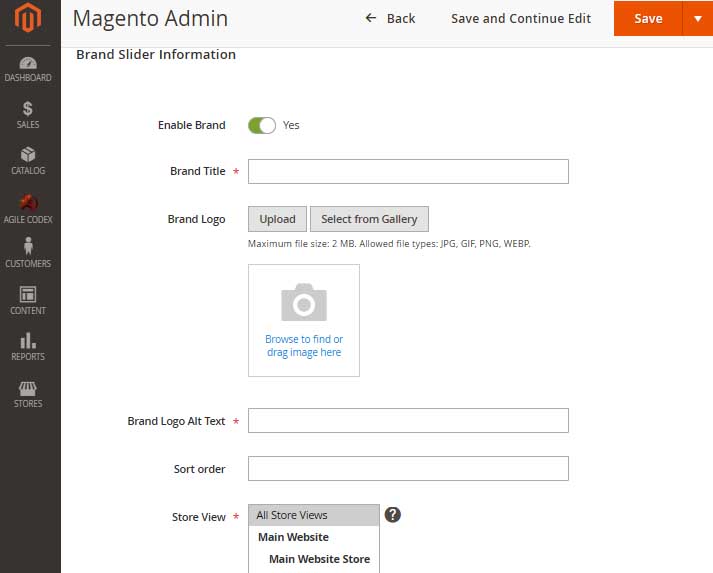
- Brand Logo
- Upload Button: Click "Upload" to select and upload a brand logo from your local files.
- Select from Gallery Button: Choose "Select from Gallery" to pick a logo from the media gallery.
- Drag and Drop Area: Alternatively, you can drag and drop an image file into the designated area.
- Note: The maximum file size for the logo is 2 MB, and allowed file types are JPG, GIF, PNG, and WEBP.
- Brand Logo Alt Text: Provides alternative text for the brand logo. This text is used for accessibility and SEO purposes, ensuring that screen readers can describe the image.
- Sort Order: Specify the sort order for the brand. Brands with lower sort order values will appear first. This helps in organizing the display sequence of the brands.
- Store View: Select the store views where the brand will be visible. You can choose "All Store Views" or specific views such as "Main Website" or "Main Website Store."
Brand Page Information
The "Brand Page Information" section of the form is used to insert new brand information, its product attribute, a URL key (auto-generated if empty), and a descriptive content for the brand page.
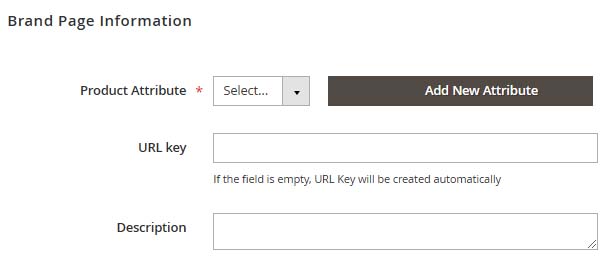
Product Attribute: Select the product attribute from the dropdown menu to associate with the brand page. If the desired attribute is not listed, you can click the "Add New Attribute" button to create a new one.
URL key: Specify a URL key for the brand page. If this field is left empty, the system will automatically generate a URL key.
Description: Provide a description for the brand page. This field allows you to add relevant details about the brand, which will be displayed on the brand page.
List of Products in Brand
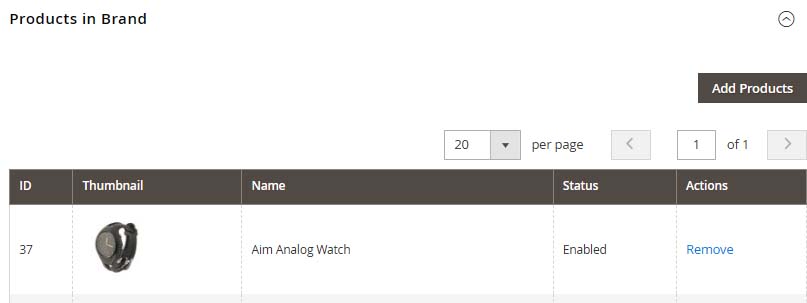
The "Products in Brand" section of the form is used to add and manage all the products associated with the brand. The product list section depends on selecting the Product Attribute Option for the brand. Once the Product Attribute is saved, you can add or remove products associated with this brand. After setting the attribute and adding products, you should not change the brand attribute from the Configuration page.
DISPLAY PAGE LIST ON FRONTEND
According to your configuration, brands are displayed as clickable links or dropdown options under a dedicated "Brands" or similar menu item. Your customers can easily discover and access brands directly from the menu structure.
-
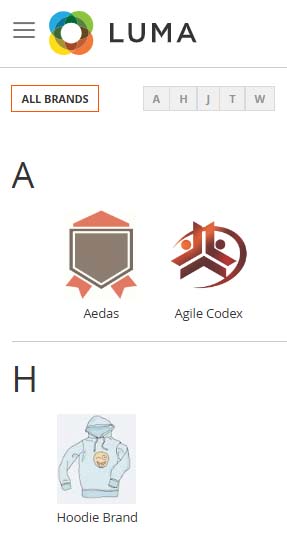
Brand Listing Page:
The page displays a list of brands available in the store. Each brand is typically represented with its logo or name, often clickable to navigate to the brand's specific page or associated products.
-
Brand Filters and Search:
Depending on the implementation, users may be able to filter products by brand.
-
Brand Presentation by Letters:
All Brands are displayed by Letters to enhance brands Presentation, such as customizable brand pages with images, descriptions, and links to related products.
It supports SEO-friendly URLs and meta information to improve brand visibility in search engines.
Brand Page Features:
Like brand list page, you can exhibit a brand page with logo and banners:
-
Brand Logo and Name:
Displays the brand's logo prominently and includes the brand's name for easy identification.
-
Description and Story:
Provides a brief description or story about the brand with its values, history, or unique selling points.
-
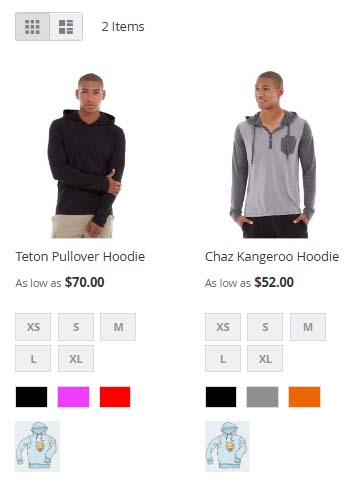
Product Showcase:
Lists products associated with the brand.
-
SEO Optimization:
Optimizes the page for search engines with relevant meta titles, descriptions, and keywords.
DISPLAY BRAND SLIDER ON FRONTEND
A brand slider can be added to frontend CMS pages in two ways: by inserting a widget into the CMS page using PageBuilder, or by creating a new widget through the widget wizard.
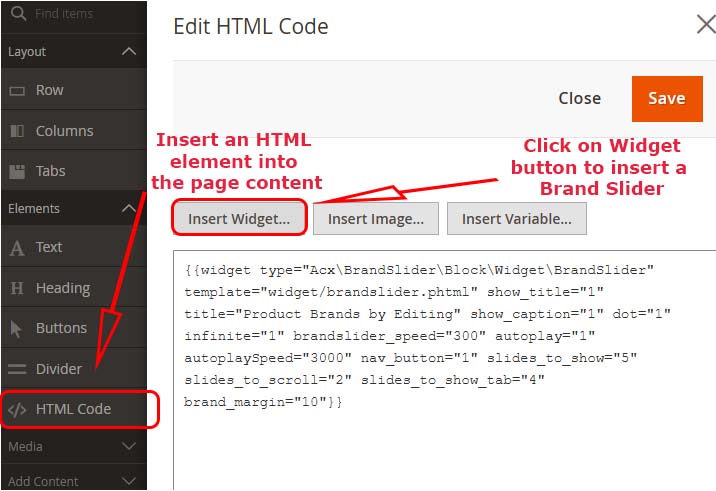
Inserting Widget using page builder
This image shows how a brand slider can be displayed on the frontend by inserting a widget or the provided code snippet into CMS pages or blocks.
- Navigate to Content > Pages or Blocks.
- Create a Page or Block or click Edit next to the page you want to modify.
- In the Page Information or Block Information section, click on the Edit with PageBuilder button.
- From the left sidebar in PageBuilder, Drag the HTML Code element into the desired location in your layout.
- Click on Edit icon on HTML Code: A new Edit HTML Code panel will appear.
- Insert Widget:: A new configuration panel will appear.
- Configure the Widget:
- After placing the widget, the configuration panel appears.
- Click Select Widget and choose the widget type, then click Continue.
- Set Widget Options:
- Fill in the required details in the configuration panel.
- Configure settings like title and display options.
- To Save the Widget Configuration, click Insert Widget button.
- Save the Changes: Click Save in the upper right corner of PageBuilder.
Add Widget and link with a CMS page
- Navigate to Content > Widgets. Click "Add Widget" and select "Brand Slider".
- Configure the widget settings and select the store views. Add the widget to the desired layout.
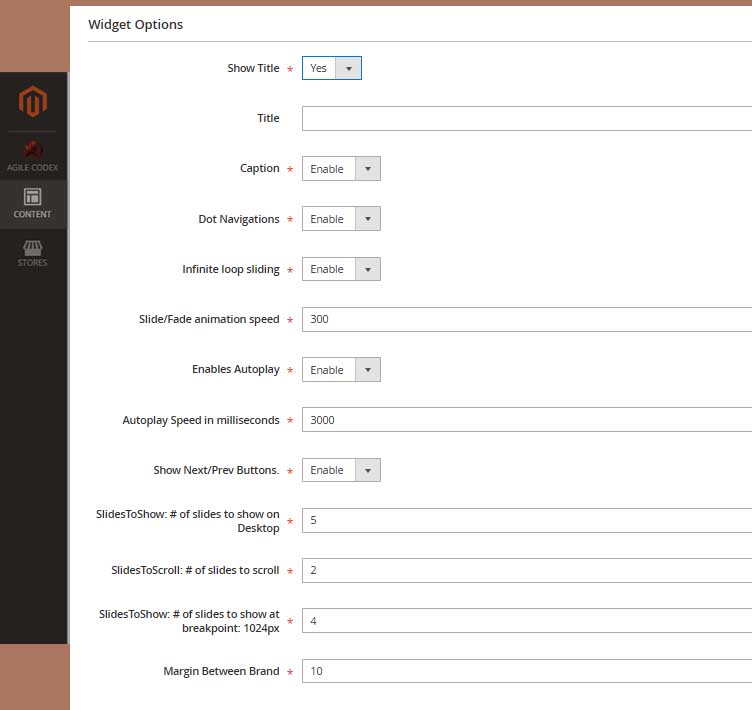
Widget Options
- Show Title: Yes
- Title: Caption
- Enable Dot Navigations: Enable
- Infinite loop sliding: Enable
- Slide/Fade animation speed: 300
- Enables Autoplay: Enable
- Autoplay Speed in milliseconds: 3000
- Show Next/Prev Buttons: Enable
- SlidesToShow: # of slides to show on Desktop: 5
- SlidesToScroll: # of slides to scroll: 2
- SlidesToShow: Number of slides to show at breakpoint 1024px: 4
- Margin Between Brand: 10
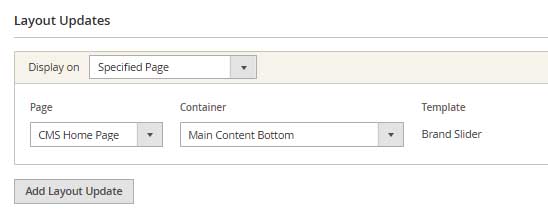
If you insert a brand slider widget into the "Main Content Bottom" area of your homepage, it may display your brand logos as shown below:
